 Jigar Karangiya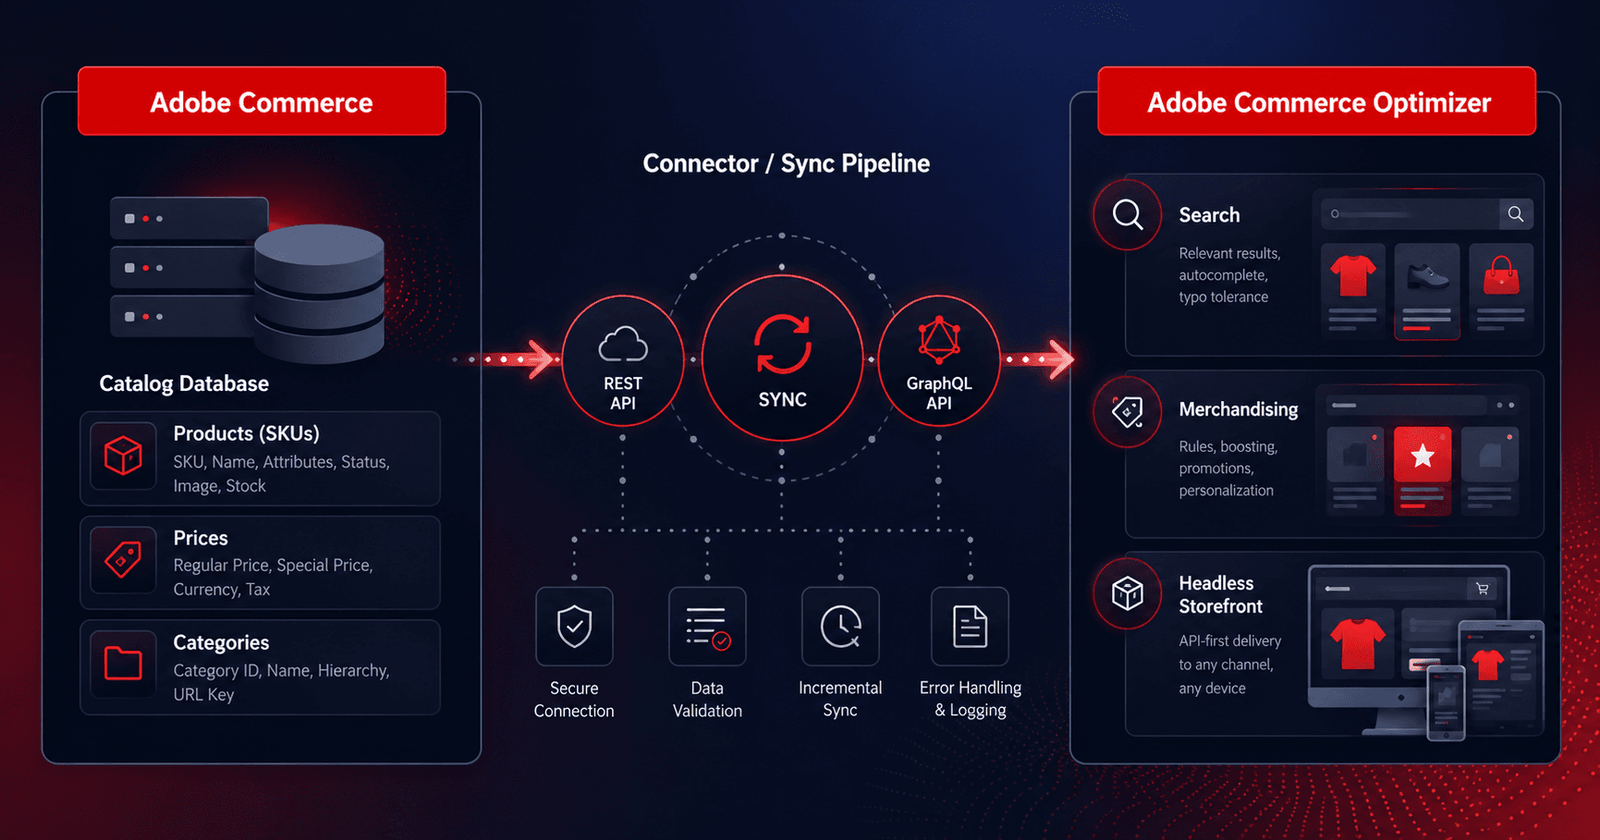
If you already read my Adobe Commerce Optimizer overview, you know the pitch: keep Adobe Commerce as your system of record for cart, checkout, and orders, and let Commerce Optimizer handle discovery, search, recommendations, and the headless storefront layer.
The bridge between those two worlds is the Adobe Commerce Optimizer Connector. It is a native, first-party integration. You do not need to build custom feeds or maintain export scripts. Adobe Commerce stays the source of truth for products, prices, and catalog structure. Commerce Optimizer becomes the experience and merchandising layer.
This guide walks through installation, configuration, how the sync pipeline works, and how to verify your data landed where it should.
Note
The connector applies to Adobe Commerce on Cloud (PaaS) and on-premises projects only. It does not apply to Adobe Commerce as a Cloud Service in the same way. See Adobe’s product solutions documentation for details.
What the connector syncs
Adobe Commerce remains your system of record. When you update catalog or price data in Commerce, the connector pushes those changes to Commerce Optimizer.
The connector exports five feed types:
| Feed | What it contains |
|---|---|
products | Product data |
productAttributes | Attribute metadata |
priceBooks | Price book definitions |
prices | Product prices |
categories | Category data |
Commerce scopes map directly into the Optimizer catalog model:
- Store view → Catalog Source. Each store view becomes a separate Catalog Source in Commerce Optimizer, including localized attributes and store-view-specific data.
- Website → Price Books. Each Adobe Commerce website maps to one or more Price Books. Website pricing and customer group pricing export as price books and price entries.
- Customer group → Price variants. Customer group pricing appears as additional entries in the relevant Price Books.
Price books use the naming convention **< website>::<SHA1 of customer group ID>**
Under the hood, the connector is built on SaaS Data Export. It maps collected feeds to the Catalog Data Ingestion API format and handles authentication and submission.
Prerequisites
Before you touch Composer, confirm you have everything in place.
Platform requirements:
- Adobe Commerce 2.4.7+
- PHP 8.2, 8.3, or 8.4 (connector release 1.0.14 also adds PHP 8.5 support per release notes)
- Composer 2.x
- Commerce Optimizer license with a provisioned sandbox instance
- Authentication keys to download the connector metapackage
Access requirements for the person doing the setup:
- Administrator access to the Commerce Admin
- Command line access to the Adobe Commerce application server
- Developer access to the IMS Organization where the Commerce Optimizer project is provisioned
- Admin access to a Commerce Optimizer sandbox instance
Environment matching (do not skip this):
Always connect sandbox Optimizer instances to non-production Commerce environments. Production Optimizer pairs with production Commerce. Mix them and you get inconsistent catalog data, broken search, and recommendations you cannot trust. Adobe calls this out as an important requirement in the Get Started guide.
Remove conflicting extensions first
This step matters more than most teams expect. If any of the following extensions are installed, uninstall them before installing the ACO Connector:
- Adobe Commerce Live Search (
magento/live-search) - Adobe Commerce Product Recommendations (
magento/product-recommendations) - Adobe Commerce Catalog Service (
magento/catalog-service,magento/catalog-service-installer) - Data Management Dashboard (
magento-catalog-sync-admin)
The data from those extensions stays in your Commerce database. It just does not export to Commerce Optimizer once the connector is enabled. Search, facets, synonyms, and recommendations move to the Commerce Optimizer Admin UI instead.
If you skip removal, Adobe warns you may see:
- Broken configuration screens
- Duplicate data in Commerce Optimizer (same data exported from both the connector and the old extensions)
- 401 or 403 errors in logs from authentication conflicts
Step 1: Install the connector package
The connector ships as a Composer metapackage for merchants with an active Commerce Optimizer license.
On your Adobe Commerce staging environment, run:
composer require adobe-commerce/commerce-data-export-aco-adapterDeploy the changes. After deployment, a Commerce Optimizer option appears in the Commerce Admin menu. Selecting it opens your Commerce Optimizer instance directly from Admin.
For platform-specific install steps, see:
- Install extension on Adobe Commerce on Cloud Infrastructure
- Install extension on Adobe Commerce on-premises
Step 2: Configure Commerce scopes
By default, sync is enabled for all Commerce scopes: websites, customer groups, and store views. You can limit export to specific scopes if your business needs it.
One practical example from the docs: if you have multiple store views sharing the same language, export data for only one store view and use it as a catalog source for multiple catalog views in Commerce Optimizer.
Do this before you enable the integration. Changing export settings triggers a full re-indexation. On a large catalog, that takes significant time.
To change scope export settings:
- In Commerce Admin, go to Stores > Settings > All Stores
- Select the website or store view you want to configure
- In the Commerce Optimizer exporter settings, use the checkbox to enable or disable data sync
- Save your changes
What happens when you disable a scope:
| Action | Result |
|---|---|
| Disable a store view | Synced catalog data is removed on the next cron run. The catalog source remains in Commerce Optimizer, but the data is cleared. |
| Disable then re-enable a store view | The same catalog source repopulates via a full resynchronization. |
Step 3: Enable the integration
Enable the integration and kick off the initial sync with the aco:config:init CLI command. This command:
- Obtains an IMS access token from credentials you supply on the command line
- Calls the Commerce Cloud Manager (CCM) service at
https://ccm.api.commerce.adobe.com/api/v1/tenants/{tenantId}/owner/{orgId}to validate the tenant and extract the ingestion URL and Commerce Optimizer Studio URL - Saves all configuration (client secret encrypted) to
core_config_data - Schedules the initial full sync by invalidating all Commerce Optimizer feed indexers
Background sync starts immediately after configuration completes. Depending on catalog size, that can take from a few minutes to several hours.
Get IMS credentials
From the Adobe Developer Console, create a project enabled for the Commerce Optimizer Ingestion service and generate OAuth Server-to-Server credentials. Full steps are in Obtain IMS Credentials in the Merchandising Developer Guide.
Save these values:
- Organization ID (
org_id) - Client ID (
client_id) - Client Secret (
client_secret)
Get the tenant ID
Find the tenant ID from the Instance Id field on the Commerce Optimizer instance details page, or from the instance URL. Example pattern:
https://experience.adobe.com/#/@<your organization>/in:<tenant ID>/commerce-optimizer-studio/homeRun the init command
- From Commerce Admin, select Adobe Commerce Optimizer to open the configuration page with instructions
- SSH into your Adobe Commerce staging environment
- Run:
bin/magento aco:config:init --org_id=your-org --tenant_id=your-tenant --client_id=your-client-id --client_secret=your-secret- Return to Commerce Admin and select Adobe Commerce Optimizer again. It should open the Commerce Optimizer UI in a new tab, confirming the connection.
To review stored config later (client secret is not displayed):
bin/magento aco:config:showConfiguration paths live under aco_exporter/general/ in core_config_data.
How the sync pipeline works
Once configured, most updates sync automatically through cron jobs. Here is the flow from the Connector sync pipeline documentation.
Stage 1: Entity change detection (every 1 minute)
A cron job (indexer_reindex_all_invalid) detects Commerce entity changes and triggers SaaS Data Export, which assembles feed items.
Stage 2: Transformation
The connector picks up assembled feeds, maps Commerce entities and scopes to the format required by the Commerce Optimizer API, and prepares the payload.
Stage 3: Transmission
Transformed data is sent via HTTP POST (/v1/catalog/<feed name>) through the Adobe I/O Gateway to Commerce Optimizer, which validates and persists the feeds.
Stage 4: Persist results
API response status is written to feed tables (for example, cde_products_feed, cde_categories_feed).
Stage 5: Failure retry (every 5 minutes)
A separate cron job (*_resend_failed_items) detects failed feed items and resubmits them.
Scheduled cron jobs
| Cron group | Job | Schedule |
|---|---|---|
index | indexer_update_all_views | Every 1 minute |
index | indexer_reindex_all_invalid | Every 1 minute |
resync_failed_feeds_data_exporter | *_resend_failed_items | Every 5 minutes |
commerce_data_export | cleanup_deleted_feed_items | Daily at 2:00 AM |
Requirements: Commerce cron must be running, and feed indexers must use Update by Schedule mode. See Partial sync in the SaaS Data Export docs.
Supported feeds and API endpoints
| Feed | API endpoint | Batch limit | Indexer name |
|---|---|---|---|
products | POST /v1/catalog/products | 100 | catalog_data_exporter_products |
categories | POST /v1/catalog/categories | 100 | catalog_data_exporter_categories |
productAttributes | POST /v1/catalog/products/metadata | 100 | catalog_data_exporter_product_attributes |
prices | POST /v1/catalog/products/prices | 500 | catalog_data_exporter_product_prices |
priceBooks | POST /v1/catalog/price-books | 500 | data_exporter_price_books |
The products, productAttributes, categories, and prices feeds reuse data from SaaS Data Export indexers. The priceBooks feed is generated from website and customer group configuration and does not rely on a SaaS Data Export indexer.
Timing expectations
| Scenario | Typical timing |
|---|---|
| Routine catalog updates | 1-2 delta-sync cycles (~1-2 minutes for indexing, plus submission) |
| Transient failures | Retried every 5 minutes |
| Full sync or large catalogs | Minutes to hours |
Scope control is handled by the CommerceOptimizerScopeMapper module. Enabled scopes export on the normal delta schedule. Disabled scopes are excluded, and previously synced entities are removed from Commerce Optimizer on the next cron run.
Step 4: Verify the sync
Check export on the Commerce side first, then confirm delivery in Commerce Optimizer.
In Commerce Admin:
Go to System > Data Transfer > Data Feed Sync Status. When sync is running, feeds show successfully sent records. Select a feed to view details or troubleshoot item-level errors.
In Commerce Optimizer:
From the Commerce Optimizer menu, select Data Sync. Verify that expected products, prices, and attributes appear.
Sync is healthy when:
- Data Feed Sync Status shows successfully sent records with no unresolved item-level errors
- Data Sync in Commerce Optimizer lists the expected catalog sources, products, prices, and attributes
Manual resync when things go wrong
Automatic delta sync and the 5-minute retry loop handle most day-to-day updates. When they do not, you have three options per the Manage synchronization guide.
Option 1: Data Feed Sync Status page (Commerce Admin)
Monitor export status and resync selected connector feed items from Admin. Good for targeted fixes on specific failed items.
Option 2: Commerce CLI
Run saas:resync from the Commerce instance for connector feeds. Adobe does not recommend using this regularly. Typical use cases: initial sync troubleshooting, syncing to a new data space, or debugging.
Example for products:
bin/magento saas:resync --feed productsCategories resync was added in connector release 1.0.12:
bin/magento saas:resync --feed categoriesMonitor operations in var/log/saas-export.log. See Sync feeds using the Commerce CLI for all options.
Option 3: Upstream resync from Commerce Optimizer
If products are missing in Commerce Optimizer, confirm in Data Sync, then resync from the upstream Commerce instance using Data Feed Sync Status or the CLI.
How long does a sync take?
Before a full catalog sync or large update, estimate timing with Adobe’s Estimate data volume and sync time guide.
Key constraints:
- Connector processes feeds in single-thread mode (no parallelization)
- Ingestion API accepts up to 2 requests per second
- Base allocation limits: up to 1,000 products per minute and up to 50,000 prices per minute
Example from the docs for a catalog with 10,000 products and 4 store views:
- Products: 10,000 × 4 = 40,000 records → about 40 minutes
- Categories (500 categories, 4 store views): about 10 seconds
- Product attributes (200 attributes, 4 store views): about 4 seconds
- Prices (10,000 products, 2 websites, 6 customer groups): about 2 minutes
Actual speed depends on payload size and server load. Plan your initial sync during a maintenance window if the catalog is large.
Troubleshooting common issues
Credentials or tenant validation fails
If aco:config:init fails during credential validation:
- Run
bin/magento aco:config:showto verify stored values - Confirm the tenant ID belongs to the IMS organization used for credentials
- Confirm the OAuth client has the necessary scopes for the Commerce Optimizer ingestion service
Data not syncing
Open Data Feed Sync Status in Commerce Admin and select the failing feed for per-item error details.
Error handling rules:
- 400 errors are not retried. Inspect the payload for malformed or missing required fields. Check Field mapping for connector feeds for the expected format.
- 5xx errors are automatically retried by the
*_resend_failed_itemscron job every 5 minutes.
If only one catalog source or price book is affected, check whether the corresponding website or store view has sync disabled in scope export settings.
For a catalog of specific misconfiguration scenarios (missing products, wrong prices, scope gaps), see Troubleshooting scenarios.
For lower-level diagnostics (log locations, feed resync commands), see the SaaS Data Export troubleshooting guide.
What to do after the first sync
Once catalog data is flowing, two next steps from Adobe’s Get Started guide:
- Configure catalog views and policies in Commerce Optimizer. Price books are created automatically from Adobe Commerce customer groups. See the Catalog views and Policies documentation.
- Set up a Commerce Storefront on Edge Delivery Services. Connect your storefront to the Commerce Optimizer instance. See the Storefront setup guide and the Headless storefront connector topic.
That second step is where the storefront work begins. Cart and checkout stay on Adobe Commerce (or another connected platform). Discovery, search, and recommendations come from Optimizer.
Official resources
All content in this post is sourced from Adobe Experience League documentation:
- Adobe Commerce Optimizer Connector overview
- Get started with the ACO Connector
- Connector sync pipeline
- Manage synchronization
- Connector modules and feed endpoints
- Field mapping for connector feeds
- Estimate data volume and sync time
- Troubleshooting the ACO Connector
- ACO Connector release notes
- Sync feeds using the Commerce CLI
This is Part 2 of my Adobe Commerce Optimizer series. Part 1:Adobe Commerce Optimizer: modernize your storefront without replatforming.